Tuesday, May 28

Girly twirly scarves!!!

Spiral scarves are all the rage where I live.  They are made with a special "pre-fab" yarn that is already machine crocheted.

So, knowing me, I had to make one from scratch -- no "pre-fab" yarn for me!!!

This little project ended up being a several month long project, and now several scarves later, I'm done -- yippee!!!

The "pre-fab" yarn is not really yarn.  It is actually machine woven or machine crocheted with thread.  For me, working with crochet thread is more difficult than yarn.  Sooo, with this in mind the first spiral, twirly scarves I made were with yarn.  I like how they turned out.

These yarn scarves are great for cooler times of the year, but for summer I needed to tackle crochet thread for a lighter, airy look.
The next scarves were made with size 3 crochet thread (so many more stitches, because of using thread instead of yarn!). 

These scarves took a lot longer to crochet than the yarn scarves. 

But so worth it because these scarves are fabulous! Once you get started the thread is easy to work with and you will truly enjoy making these crochet thread scarves. 


This yellow/orange scarf (below) took an especially long time because I threaded small clear beads onto the thread and the crocheted them into the scarf.


This is the post I was hoping to get done a couple of weeks before Mother's Day, for a Mother's Day gift idea  ---  oh well.  At least it is done in time to make some fun summery accent scarves for yourself!


I want to thank my youngest daughter (#5) for modeling the scarves for me.  And I want to thank my oldest daughter (#1) for doing the photography.

Here are the "how to" videos that will show you every step of the way to create the trendy scarves:

The video above is for the crochet thread type scarf.

This video (above) has the instructions for the spiral scarf made out of yarn.

Happy crocheting :)


.

Monday, May 20

Plenty of time for Father's Day!

Oh, I felt sad that I didn't get a post on for Mother's Day.  To prevent that from happening for Father's Day I thought I would not procrastinate (like I did for Mother's Day) and I would
"git-er-done" now!


This is a super cute origami shirt and tie card you can make for your men of the day (don't forget, it is June16th).
You just use a regular size (8.5"x 11") piece of white or colored paper for the shirt, and a smaller (3.5"x 3.5") piece of patterned paper for the tie. 
That's all you need!
P.S. This shirt can also be used as a awesome card for a missionary.


Here are a couple of easy step by step videos that show you how to fold it:

Here's how to fold the tie:


You can write a Father's Day note on the inside of the shirt.
(Yes, I know, this has a note to a future missionary and not a note to my dad -- oops!)
No matter what the age, this is a fun project to fold and make and the men in your life will love it!
~~~~~~~~~~~~~~~~~~~~~~~~~~~~~~~~~~~~~~~~~~~~~~
Now for a review of a wonderful Mother's Day . . .
It started with an absolutely delicious breakfast in bed.  Made by my daughters.

Then we finished off the day with a tea party in my mother's orchard.


Happy Be-lated Mother's Day to all the glorious mother's everywhere!!!


Tuesday, April 30

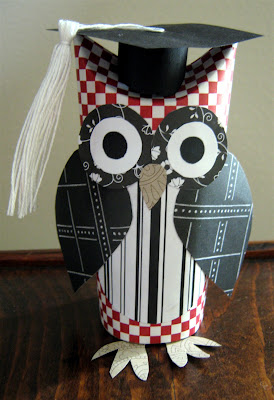
Cute GRADUATION Owls!

I don't like waste.  Sometimes I ponder really deep subjects, such as, "What can I do with this empty milk carton or empty egg carton, instead of just throwing it away?"
Or, "What can I do with empty toilet paper tubes?"
Well, you will be so happy to know that my intensive thinking and profound brain has come up with a use for a empty toilet paper tubes --- yea!!!

Seriously, I think these little owls are so cute and I like that it has multiple uses.  The owls can be used as graduation decorations and/or table favors, and as the graduation gift itself. 
How to make a Graduation Owl

As a gift, the top of the owl opens up so you can hide a note, letter, money, candy, or smaller gift inside the owl.  A fun surprise for the grad!
How to make an graduation owl

The following video shows how to make the graduation owl .  .  .


As graduation day approaches have fun getting ready for your graduate's special day :)
how to make a graduation owl

Congrats and Happy Graduation!!!!!!

Saturday, January 12

Simple Valentine Crafts Galore

Don't know about everyone else, but I appreciate simple, easy, inexpensive, and super cute craft ideas.   So, here are some Valentines ideas that fit the criteria ( they can be used for so many more things than just Valentines though -- like random "I love you" surprises and wedding or anniversaries, etc.).
 Here are some easy to follow (well hopefully they are easy to follow . . . ) links to youtube videos I did showing step-by-step "how to's":


Happy  heart and love crafting!!!

Wednesday, January 9

Ribbon Roses


Is it already time to think about Valentines Day?
I haven't taken down my Christmas tree yet!
Well I actually made these ribbon roses and the ribbon rose topiary tree before Thanksgiving so it could double as a Christmas decoration and Valentines decoration.  Smart thinking, yes? 
Ultimately, I'd like to have a grouping of three (in different sizes). We will see if I get the other two done before the end of this month.

My Mom made ribbon roses when I was little. Then she made topiary trees out of all the roses she made.  So with the help of my mom, we were able to figure out how to make these roses after all these years.

I also made boutineers with the roses. I may also try making some out of colorful print fabric to attach to a sweater or top for myself and maybe also attach them to hairbands for my granddaughters.

To make the ribbon rose all you need to purchase is floral ribbon (acetate, I think) in the colors you want.  The tools, you should already have on hand, are scissors and tweezers.


This first link to my youtube video shows how to make the ribbon roses:

This second link shows how to make the topiary tree:


I think the easiest way to secure the ribbon ends is to just tie them in a square knot in the back.  Then pin 'em to the styrofoam ball.


 Get started making flowers soon, cuz' it takes a lot of roses to cover the large size styrofoam ball.
 LOVE   LOVE   LOVE   LOVE   LOVE   LOVE   LOVE   LOVE   LOVE   LOVE  


Tuesday, November 6

Now a Star!


In my last blog post I showed how to fold flowers.  Here's another variation on this post. 
Instead of folding flowers and snowflakes, using the same simple technique you can make a beautiful star. 

So here is a quick video I did, to show how to make this star!


There are lots of ways to decorate this simple star too.  You can keep it simple, or you can add glitter, or epsom salts (just spray with adhesive and sprinkle epsom salts on the star and it resembles sparkly snow), or attach stickers or rhinestones to the star, just whatever you have on hand. 


It's an easy craft for kids.  They can color the sheet of paper you are going to use for the star first, then they can fold it and cut it and then add decorative stuff to it after it is folded, cut, and taped together.

I also love how easy it is to attach to the top of your Christmas tree, or if making several stars for tree ornaments, the wire twist tie is so easy to attach to branches all over your tree.

If making the stars to hang from your ceiling, windows, or doorways, just staple the center instead of using a twist tie or wire in the middle of the center crease.  Then tape some yarn or string or fishing line to one of the points of the star and tape the other end of the yarn, string, or line to the ceiling or door frame. 
This is a pretty decoration, hanging from the ceiling or doorway because both sides of the star look beautiful (there isn't a "wrong" side).

Oh, I'm getting so excited for the Holidays!!!!!!!!


Wanna learn something else? Just click.

Related Posts Plugin for WordPress, Blogger...